
17.3K
An FPV camera is a key component in FPV drone systems, capturing real-time video that’s transmitted to the pilot’s goggles or monitor. These small and lightweight cameras boast ultra-low latency, wide dynamic range, and provide vital visual information for FPV drone pilots to navigate and perform maneuvers. With advancing technology, some of the latest FPV cameras now offer onboard recording with image quality rivaling that of action cameras, such as the DJI O3. In this guide, we’ll discuss the key factors to consider when selecting the best FPV camera for FPV drones.

Some of the links on this page are affiliate links. I receive a commission (at no extra cost to you) if you make a purchase after clicking on one of these affiliate links. This helps support the free content for the community on this website. Please read our Affiliate Link Policy for more information.
Analog vs Digital FPV Systems

FPV systems fall into two categories: analog and digital.
Analog FPV cameras aren’t compatible with digital FPV systems, and vice versa. Currently, there are three digital FPV systems: DJI, Walksnail, and HDZero. Cameras designed for a specific digital FPV system aren’t compatible with other digital FPV systems.
If you’re unsure which FPV system to choose, take a look at the pros and cons of each system in my review: https://oscarliang.com/fpv-system/
FPV Camera Recommendations
Below are my top FPV camera recommendations for each FPV system.
DJI O3 Air Unit
DJI Vista / FPV Air Unit
For the Runcam Link (also known as Caddx Vista) and DJI FPV Air Unit, there are several camera options that excel in various aspects. If you want the lowest latency (around 30ms), choose a camera capable of 120fps, such as the Runcam Wasp, DJI OG cam, Nebula Pro and Pro Nano, or the Falcon Nano. Some older cameras that can only handle 60fps and will have higher latency, around 40ms.
Best Image Camera |
Best Lowlight Camera |
| Nebula Pro / DJI OG Cam | Caddx Polar / Runcam Wasp |
 |
 |
| The Nebula Pro offers image quality almost identical to the original DJI camera (OG cam), which I personally prefer for daytime conditions. It’s also a 120fps camera.
If you’re already using the Original DJI camera, there’s no need to switch. However, if you’re buying a new camera today, the Nebula Pro is the one I recommend due to its micro size mounting, which fits almost all frames available today. The main downside of the Nebula Pro is its low-light performance; for night flying, you may want to opt for the Polar instead. |
After testing the Caddx Polar, it’s clear that it excels in low-light performance. It also performs well during the day, making it a decent all-around FPV camera.
The main downside, however, is that it’s a 60fps camera, which has slightly more latency than the Nebula Pro’s 120fps, and it’s locked to a 16:9 aspect ratio. The Runcam Wasp also performs well in low-light situations although it’s slightly outperformed by the Polar, it’s a 120fps and support 4:3. |
| Find the Nebula Pro from these vendors:
AE: https://s.click.aliexpress.com/e/_DF4LJ8H |
Find the Caddx Polar from these vendors:
AliExpress: https://s.click.aliexpress.com Get the Runcam Wasp here: AliExpress: https://s.click.aliexpress.com |
Walksnail
Walksnail offers a few different camera options for different applications.
HDZero
HDZero offers a few camera options for different applications.
Best Camera |
Smallest Camera |
| Runcam HDZero Nano90 Camera | HDZero Whoop Lite |
 |
 |
| The Runcam HDZero Nano90 Camera offers race-winning performance for the HDZero system in 540p 90fps mode, providing the lowest latency of any video link available today. It also supports 720p 60fps for higher resolution and boasts impressive low light performance.
Note that only the HDZero Goggles support the 540p 90fps mode; for the HDZero VRX, you can only use 720p 60fps. Nonetheless, the image quality is on par with the previous Runcam Micro V2. |
The HDZero Nano Lite Camera is designed for ultra-light micro FPV drones, weighing a mere 1.5g. Combined with the new Whoop Lite VTX at 4.5g and a 0.4g dipole antenna, this combo represents the world’s lightest digital FPV solution, weighing in at under 7g in total.
Utilizing the same sensor as the Runcam Micro V2, this camera offers switchable 4:3 / 16:9 modes, customizable image settings, and exceptional low light performance. |
| Buy the Runcam HDZero Nano 90 camera here:
GetFPV: https://oscarliang.com/product-cwhq If you don’t use 90fps mode, and want a micro size camera, check out the Runcam Micro V2: GetFPV: https://oscarliang.com/product-5rbr |
Find the HDZero Whoop Lite Camera here:
AE: https://s.click.aliexpress.com/e/_DDtI5wD |
Analog
Size and Weight
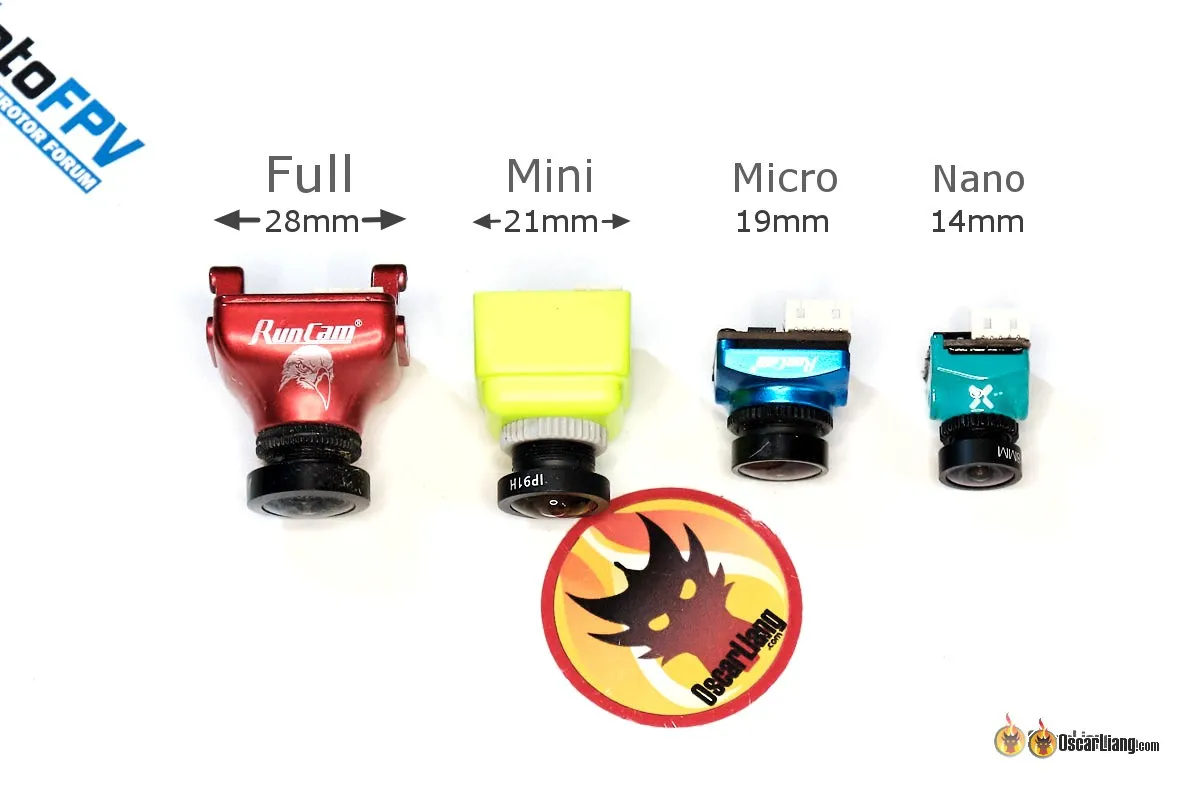
FPV camera sizes are determined by the width, which is the distance between the mounting holes on both sides. Your choice of camera size depends on your FPV drone frame and how you plan to mount it. The common sizes include:
- Standard, aka “full size” (28mm)
- Mini (21mm)
- Micro (19mm)
- Nano (14mm)
Micro size is the most popular these days, as it typically works well with modern 3-inch, 4-inch, and 5-inch frames (and larger). Drones that are smaller generally use the Nano size. Be sure to double-check the specs of your frame to confirm compatibility and avoid surprises.
Aspect Ratio

There are two aspect ratios to choose from in FPV cameras: 4:3 and 16:9.
4:3 is preferred for FPV flying because it provides more vertical FOV (field of view), which is useful when your drone tilts forward or backward while speeding up or slowing down. This allows you to see what’s in front of you more clearly. In contrast, 16:9 offers a wider view on the sides, but that information is less useful for pilots.
Additionally, if you plan to stabilize your footage using software like Gyroflow, 4:3 has an edge over 16:9 because it crops less of the image when rendering into a 16:9 video for uploading to platforms like YouTube.
Ideally, your FPV goggles should support the aspect ratio of your FPV camera. Mismatched aspect ratios can result in distorted images in the goggles. For instance, if you have a 4:3 camera and 16:9 goggles, the image will appear stretched.
Some FPV cameras allow you to switch between 4:3 and 16:9 aspect ratios. However, when switching to a non-native aspect ratio, you will experience a reduced FOV due to cropping. It’s best to use the native aspect ratio of the camera for optimal performance.
Field of View
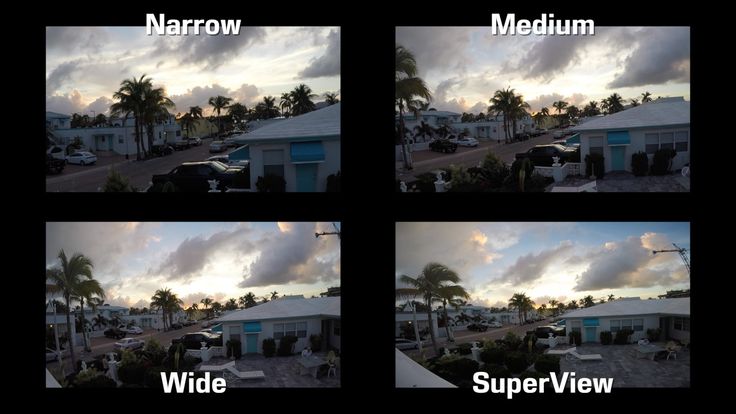
The field of view (FOV) of an FPV camera determines the angle of the captured image. A smaller FOV results in a more zoomed-in image, allowing you to see obstacles like branches more clearly. A wider FOV lets you see more of the environment, which might be preferred for proximity flying and racing.
However, when the FOV is too large, the image appears distorted, resulting in so called “fish-eye” effect. Objects in the center would appear smaller and further away than they are in reality, while the edges of the image appear curved and distorted.
There is no “best” FOV, as it ultimately depends on personal preference and the type of environment in which you fly.
FOV is affected by the lens’s focal length and the image sensor size. A shorter focal length and a larger sensor size result in a wider FOV. Here’s a rough estimation of FOV for a camera with a 1/3″ sensor size in 4:3 aspect ratio:
| Lens Focal Length | Approx. FOV |
| 1.8mm | 160° – 170° |
| 2.1mm | 150° – 160° |
| 2.3mm | 140° – 150° |
| 2.5mm | 130° – 140° |
| 2.8mm | 120° – 130° |
| 3.0mm | 110° – 120° |
As mentioned previously, aspect ratio can also affect FOV if the camera supports both 16:9 and 4:3. In this case, selecting a non-native ratio will simply crop the sides or the top and bottom, resulting in a smaller FOV.
Wide Dynamic Range

The Wide Dynamic Range (WDR) of an FPV camera determines the image quality in extreme lighting conditions where both bright and dark areas are present in the same frame. A good camera should ideally allow the pilot to see as much detail in the shadows as possible while preventing the sky from being overly overexposed. Choosing an FPV camera with decent WDR capability is crucial, as it helps you see better while flying, ultimately helping you avoid obstacles and crashes.
Low Light Performance

If you plan to fly in low light conditions, such as indoors or during sunset/night, it’s essential to choose a camera with good low light capabilities.
Apart from checking reviews, you can gauge a camera’s low light performance by its LUX number in the specifications. The lower the LUX value, the better the camera’s low light performance. Furthermore, cameras with larger imaging sensors generally perform better in low light conditions, as more light enters the sensor.
Latency
Latency refers to the time it takes for the FPV camera to capture, process, and transmit the image to the video transmitter. For drone racing enthusiasts or those engaging in high-speed flying, latency can be a crucial factor in selecting an FPV camera. Lower latency allows pilots to react more quickly, enabling better control and avoiding potential obstacles or crashes.
Analog FPV Camera Considerations
CCD and CMOS

In analog FPV cameras, there are two common types of image sensors used: CCD and CMOS, each with unique characteristics and advantages.
CCD is an older technology and used to be the go-to image sensor for FPV cameras since it performed better than CMOS at the time. However, CMOS technology has improved rapidly, and it’s now just as good as CCD, if not better. Modern analog FPV cameras almost exclusively use CMOS sensors, which are continually getting better and more affordable.
For more details, check out this article about the differences between CCD and CMOS: https://oscarliang.com/cmos-ccd-fpv-camera-multicopter/. Here is a summary of the pros and cons of both types of sensor:
CCD:
- Less jello effect in footage due to global shutter
- Less image processing and digital artifacts, however resolution and image detail usually appear lower than the best CMOS cameras
- Above average performance in low light, dynamic range and light/dark transition
- Better image contrast than CMOS
- CCD cameras perform similarly across the board, unlike CMOS cameras with varying performance
CMOS:
- More susceptible to jello due to rolling shutter
- Varying performance and price: the most expensive cameras are usually CMOS, and ironically, the cheapest cameras are also CMOS, while CCD is typically in the mid-price range
- Generally lower in latency
- Higher resolution and sharper image, with the trade-off of potentially over-sharpening and digital artifacts
- Low light/night FPV cameras tend to use large CMOS sensors
- Usually more flexible/dynamic with camera settings
Image Sensor Size

In addition to CCD and CMOS types, image sensors also come in different sizes. The two popular sensor sizes for analog cameras are 1/1.8″ and 1/3″, with the former being larger and the latter being smaller.
Sensor size influences low light performance and dynamic range. Generally, a camera with a larger sensor can have better low light performance under the same settings. Additionally, a larger sensor provides a wider field of view (FOV) when using the same focal length lens.
Camera Lens

You can replace the lens on an analog FPV camera to achieve a different FOV or image quality. FPV camera lenses primarily differ in two aspects: focal length and thread size. For more in-depth information, you can refer to our article specifically about FPV camera lenses.
Full-size cameras typically use larger and heavier lenses with 12mm diameter thread that can be screwed into the housing, known as M12 lenses. Smaller 8mm lenses, or M8 lenses, are utilized to make cameras more compact and lightweight. M12 lenses allow more light in, resulting in marginally better image quality compared to M8 lenses. M8 lenses are highly compact and are mostly used in Micro and Nano cameras.
NTSC and PAL

The main difference between NTSC and PAL lies in their resolution and frame rate. PAL (720 x 576 @ 25fps) offers slightly better resolution, while NTSC (720 x 480 @ 30fps) provides a higher frame rate. If you prefer better picture quality, choose PAL; if you want smoother footage, opt for NTSC. For a more detailed comparison, check out this post.
Traditionally, NTSC is used in North America, Japan, and South Korea, while PAL is employed in most of Europe, Australia, and large parts of Africa and Asia. It might be a good idea to adhere to the standard in your country. However, this is less of a concern nowadays, as both video formats are fully supported by all FPV equipment.
Remember to select the appropriate format your camera uses in Betaflight OSD to ensure that the text is displayed correctly.
TVL
TVL, or “TV lines,” is the term used by manufacturers to measure the resolution of analog FPV cameras.
TVL is measured by connecting the camera to a display and having it capture an image of a card with alternating black and white lines. The maximum number of distinct black and white lines that the camera can detect is its TVL value, which represents the image detail the camera is capable of producing.
However, TVL has become less meaningful in recent years, as manufacturers often inflate these numbers as a marketing tool. Instead of relying on TVL, choose your camera based on the image quality demonstrated in reviews.
How to Connect an Analog FPV Camera to a VTX?

Wiring an analog FPV camera in your drone varies depending on the application and components involved. At its most basic, an FPV camera has three wires to connect: video signal, power, and ground.
To connect the FPV camera directly to a VTX, connect the signal wires, and ensure you have a working video receiver on the same channel in your FPV goggles to get an image. Also, connect the ground wires of both the FPV camera and VTX if they are powered from different sources.
Modern FPV cameras support a wide range of input voltage (e.g., 5V to 36V), allowing you to power them from a regulated 5V BEC or directly from a LiPo battery (2S-8S).
Consider these good practices when connecting your FPV setup for cleaner video: https://oscarliang.com/connect-vtx-fpv-camera/
Using the flight controller (FC) with a built-in OSD chip is the most common way to connect an FPV camera. Connect the camera signal to the video input on the FC, and connect the video output on the FC to the VTX.

Some optional connections may be available depending on the camera’s features, such as:
- TX and RX (UART) for connecting to the FC, allowing camera settings to be changed using your radio
- OSD or Menu pins for connecting a joystick for changing camera settings
- VBAT or VSEN for monitoring battery voltage
Recording Flight Footage
There are several ways to record flight footage from your FPV camera:
- FPV Goggles with DVR: Most FPV goggles have a built-in DVR (digital video recorder) that records whatever is displayed on the screen, even including the signal break-ups.
- VTX with Onboard Recording: Some video transmitters (VTX) feature onboard recording capabilities, which deliver higher quality footage compared to DVR recordings in goggles. They don’t include signal break-ups experienced during flight. Examples of such VTXs include the DJI O3 Air Unit and the Walksnail Avatar VTX.
- External DVR for Analog: For analog setups, you can use an external DVR connected directly to the FPV camera inside the drone. This method records footage without any interference and generally offers better image quality since there’s no quality loss from the 5.8GHz wireless link.
For the best possible image quality, consider mounting an action camera, such as a GoPro, on your drone. This option captures high-quality footage that can be used for various purposes, including sharing online or analyzing flight performance.
Can I use HD cameras as FPV cameras?
While it’s true that many stunning HD FPV videos on YouTube are captured using HD action cameras such as GoPro or Runcam 3, these cameras are generally not suitable for real-time FPV flying.
Some HD cameras offer “video out” capabilities, allowing them to be connected to an video transmitter for FPV. However, the latency in these cameras is typically too high for FPV flying (often over 100ms), making it challenging to react in time to prevent crashes. As a result, it’s recommended to use a dedicated FPV camera for real-time flying and.
How to Setup OSD

OSD (on-screen display) is a feature that overlays useful flight information onto your FPV goggles during flight. Depending on your specific FPV system, the process for setting up OSD may vary. Below are tutorials for various systems:
These tutorials will guide you through the necessary steps to configure OSD for each system and help ensure that you have access to valuable flight information during your FPV flying experience.
You made it!
Congratulations on reaching the end of this comprehensive FPV camera guide! I sincerely hope that the information provided has been helpful in your quest to find the perfect FPV camera for your needs. If you have any questions or comments, please don’t hesitate to reach out. Happy flying!
Edit History
- Dec 2014 – Article created
- Nov 2016 – Updated info about CMOS vs. CCD, Added info about OSD and camera size
- May 2018 – Added info about camera control
- Nov 2018 – Added info about low light capability
- Mar 2019 – Added a little history about camera development between 2013-2016
- Oct 2019 – Updated info regarding FOV, lens sizes, sensor sizes, CCD/CMOS, Built-in Mic, DVR, and connection
- Apr 2023 – Added FPV camera recommendations for all available FPV systems, DJI, HDZero, Walksnail and analog. Revisited the guide, shortened URL.
- Mar 2024 – Updated products


