
Motivation
One of the core practices of any well-functioning development team is to
hold regular demos of the latest improvements in the product they are
building. If the product has a user interface, then the demo is naturally
provided through the UI itself, maybe even letting the stakeholders attending
the meeting play with it directly.
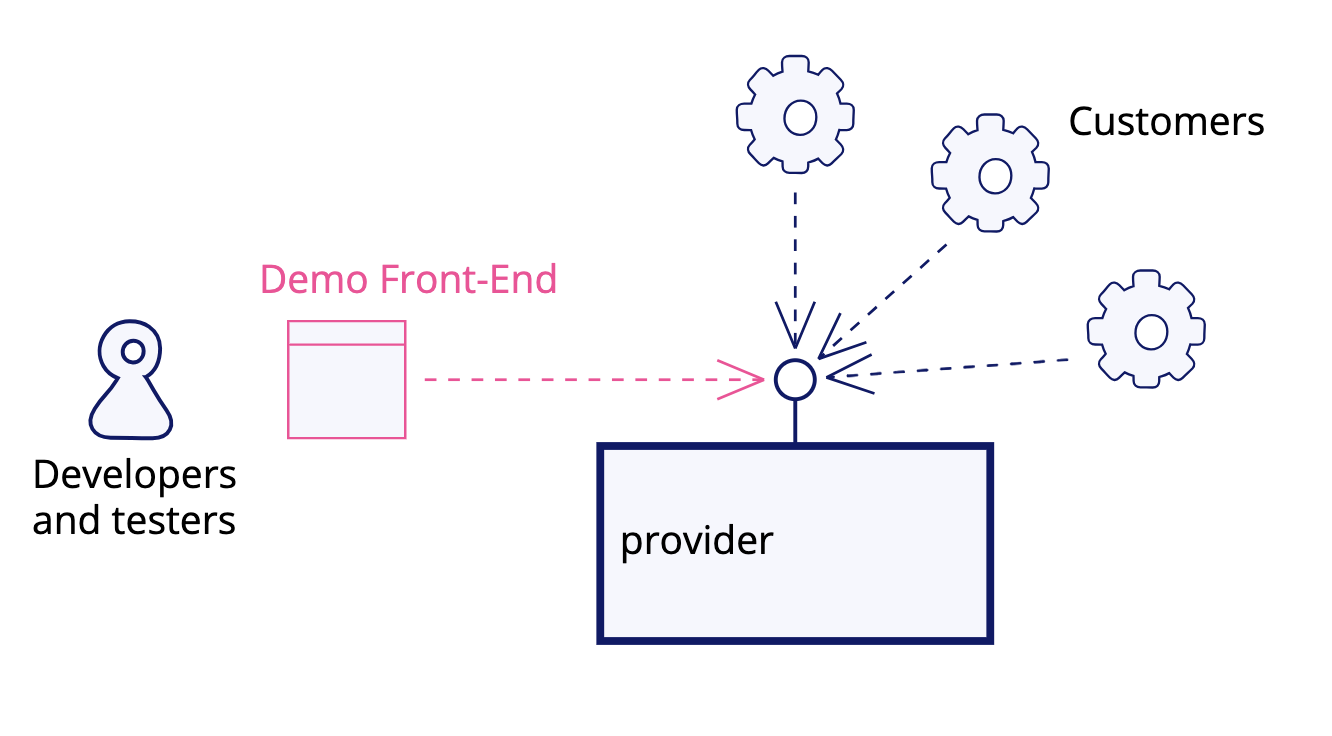
But what if the product is an API? Usually we recommend that the backend
and the frontend are developed by the same team, because this usually leads to
higher quality and shorter development time, compared to the situation where
two separate teams have to coordinate. There are cases, though, when this is
not possible: sometimes the backend (API) is developed by a company that sells
to third parties access to a useful service through that API. Examples would
be: a financial institution providing a “payment gateway” API that lets
e-commerce websites receive payments from customers; or a service provider
that interfaces to price comparison engines through an API that the price
comparison engine calls.
In all those cases where the API does not have a natural user interface, it
becomes difficult to provide a meaningful demo. Sometimes the team tries to
demonstrate usage of the API by showing the JSON code being returned by the
API, but this is not easy to understand, especially by non-technical
stakeholders. And letting business stakeholders play with the product becomes
almost impossible.
In these situations, we found it beneficial to develop a simple UI,
specifically for the purpose of API demonstration.
The UI does not need to be fancy or especially good looking, and it does not
need to involve setting up a dedicated build; the purpose is to make it a snap
to show API usage.
The benefits of such a Demo Front-End are not limited to showcasing the
software during the demos; once you make it available, it will be used by
developers to test new features on their local machines before pushing the
code to the repository, and by quality analysts, product owners, and other
stakeholders to test the product in test environments. It can also be used to
demonstrate usage of the API to potential partners who might be interested in
purchasing access to it. The Demo Front-End is a gift that keeps on giving.
Practical advice
The Demo Front-End works best when it’s immediately available in all the
places where the related API is available. For instance, in a Spring Boot
application, you may place static HTML, CSS and JavaScript assets in the
src/main/resources/public/testdrive folder, so that it will be possible to
access them by opening a browser at, for instance,
https://localhost:8080/testdrive/. The simplest possible demo UI does little
more than replace Postman:
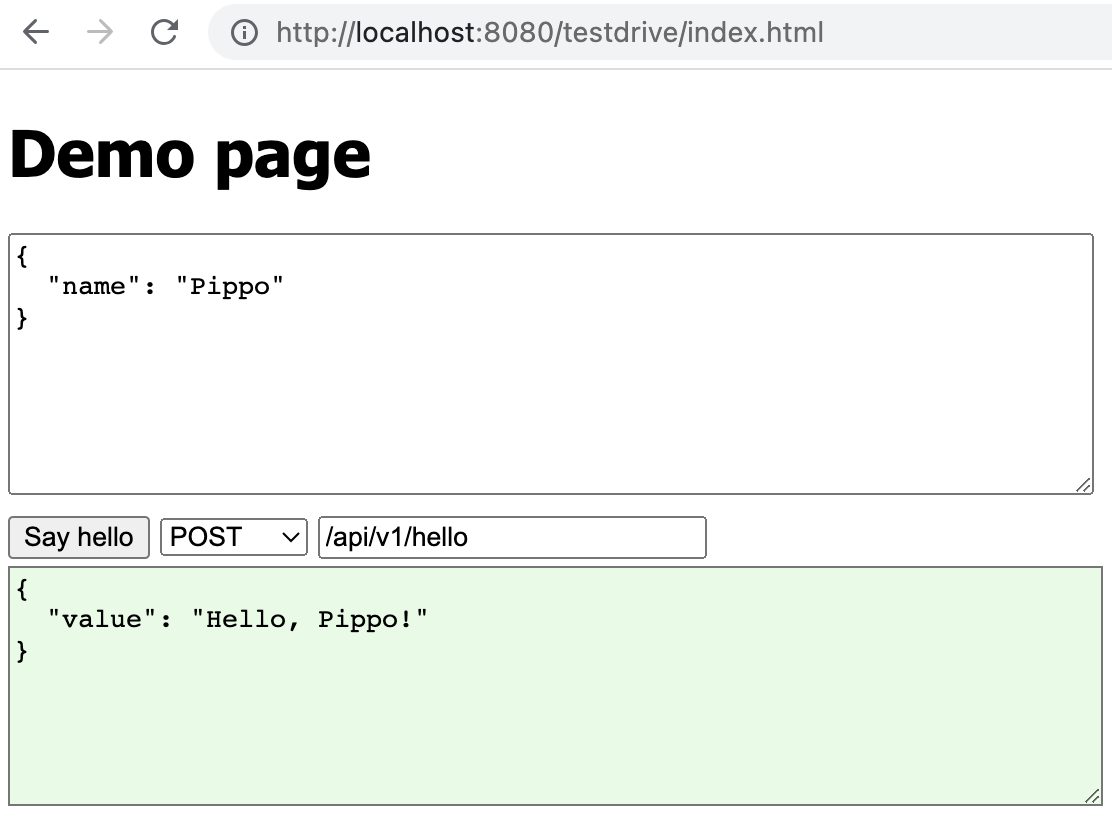
Figure 2: The user can tweak the request payload, method and path: the response appears in the lower window,
colored green to signify a successful response
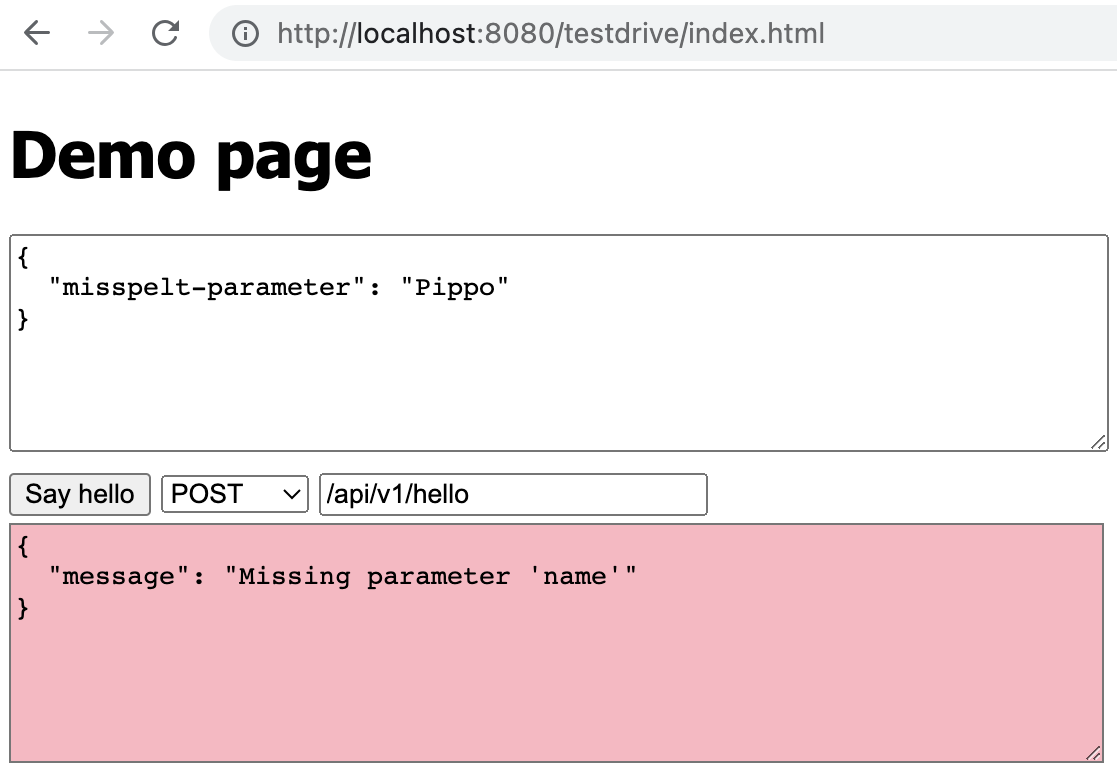
Figure 3: Error responses are made more evident by coloring the
output text area pink
The demo UI prepares a valid JSON request for a given API endpoint, then it
lets the user modify the request by hand to suit what they want to test, and
when the user presses the button, it will display the response, possibly along
with the http status code and any relevant headers.
Even though at this point we’re still showing JSON as both input and
output, we have a considerable advantage over Postman, in that we can use
automation to augment or modify a static version of the input JSON that is
proposed to the user. If, for instance, a valid request should contain a
unique identifier, a short snippet of JavaScript can generate a random
identifier with no effort required on the part of the user. What is key here
is that the UI allows a quick test with minimal friction.
The JavaScript required for making a Demo Front-End such as this one is
minimal: current JavaScript is powerful enough with no need for specific
libraries, though developers might find it handy to use lightweight tools such
as htmx, jQuery or even inline React. We recommend to avoid setting up a
dedicated build, as this introduces extra steps between running the API and
executing a test through the UI. Ideally, the only build we’d like to run is
the build of the API product itself. Any delay between the desire to test
something and the moment we are actually executing the test slows down the
development loop.
The natural evolution of such a UI is to
- Add facilities to generate different types of input; perhaps replace
completely the JSON textarea with a proper HTML form - Parse and show the output in a way that’s easy to understand
For instance, suppose we have a travel-related API that allows us to book
flights, with the purpose to find the best deals for travellers who can be
flexible on the date. We might have an initial API that performs a search and
returns a list of prices combinations. The input JSON might look like
{
  "departure-airport": "LIN",
  "arrival-airport"  : "FCO",
  "departure-date"   : "2023-09-01",
  "return-date"      : "2023-09-10",
  "adults"           : 1,
  "children"         : 0,
  "infants"          : 0,
  "currency"         : "EUR"
}
Our demo UI will load in the input text area a sample payload, thus sparing
the user from having to remember the precise syntax.
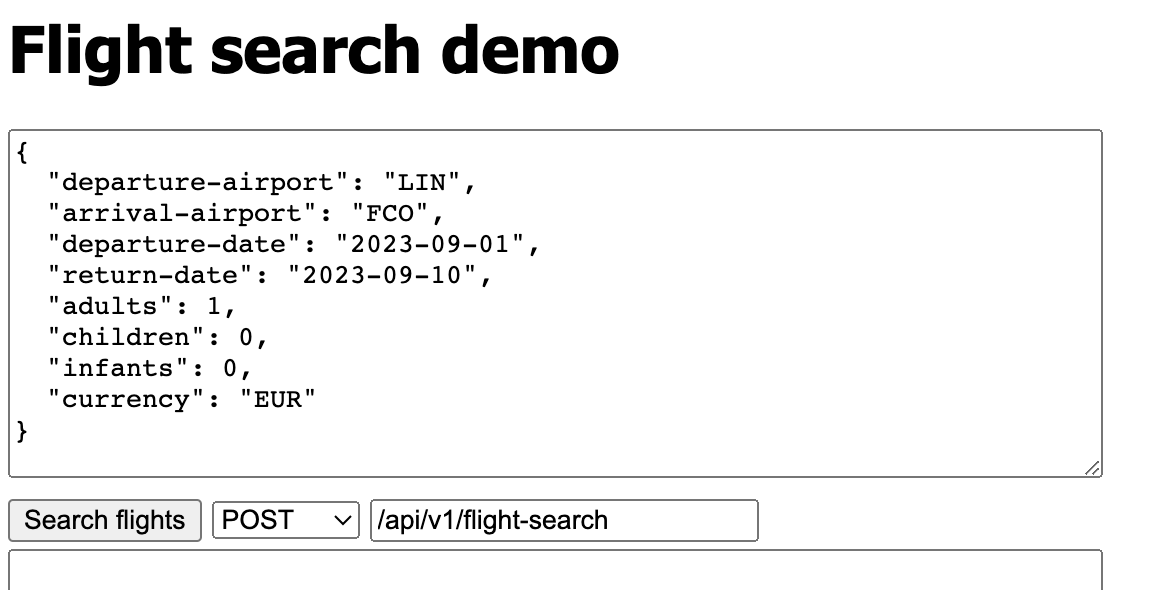
Figure 4: Real JSON payloads tend to be complicated
However users might need to change the dates, because any static departure
or arrival date will eventually become invalid as time passes and the dates
become past, and changing the dates takes time, and can result in further time
lost because of manual errors. One solution could be to automatically modify
the dates in the JSON, setting them to, say, 30 days in the future. This would
make it very easy to perform a quick “smoke test” of the API: just click
“Search flights” and see the results.
We could take this a step further: for instance, sometimes we might want to
check the prices of flights roughly six months in the future; sometimes 3
months, and sometimes just one week in advance. It is cool to provide a UI
that allows the user to quickly change the JSON payload by selecting from
drop-down menus. If we provide the same for other input fields, for instance
the airport codes, we remove the need for the user to look up airport codes,
which also takes valuable time.
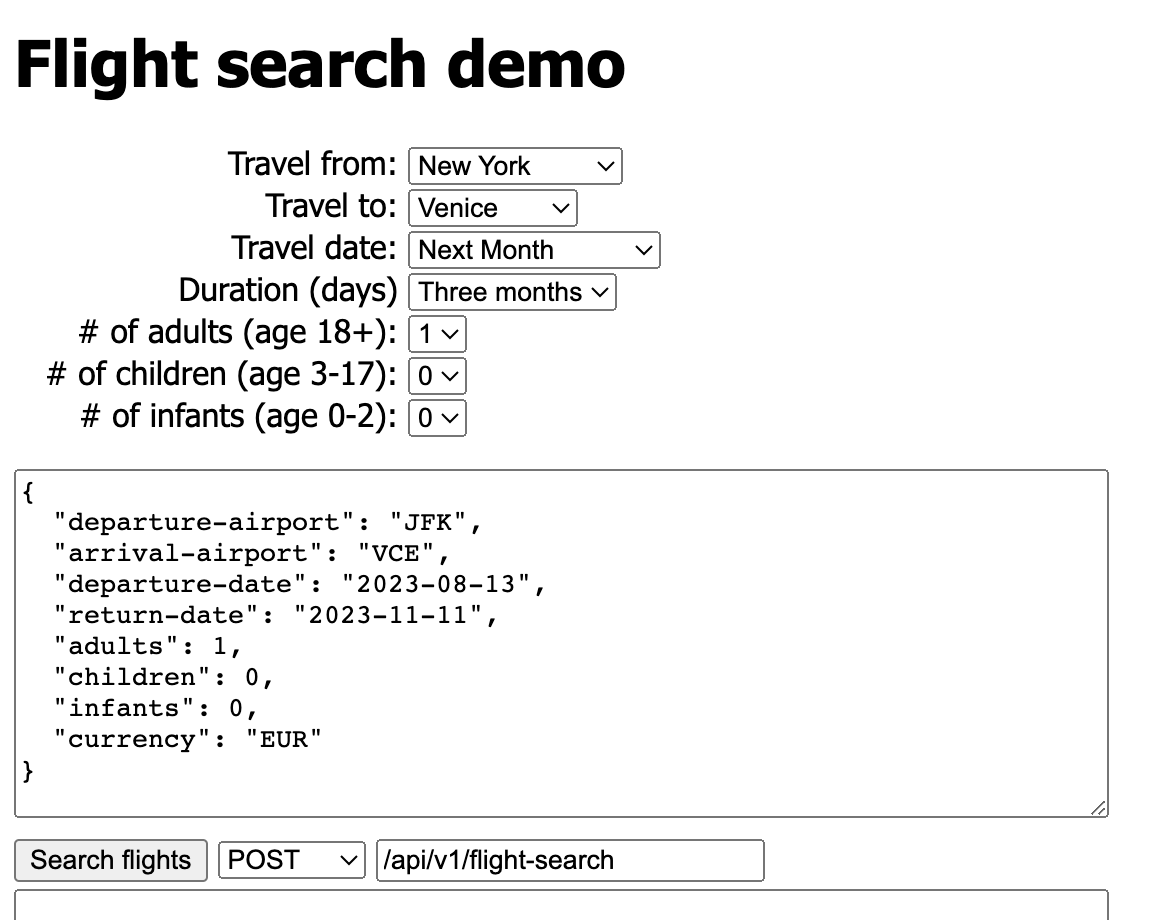
Figure 5: Adding an HTML form to tweak the payload
automatically
The above UI makes it quick and easy to change the JSON payload, requiring
very little expertise from the part of the user. It is still possible to
inspect the generated JSON, and the user can change it directly, if they want
to test a case that is not covered by the HTML form.
The flights search API could return a matrix of prices varying by date,
that allows a customer to choose the best combination of departure and return
flights. For example:
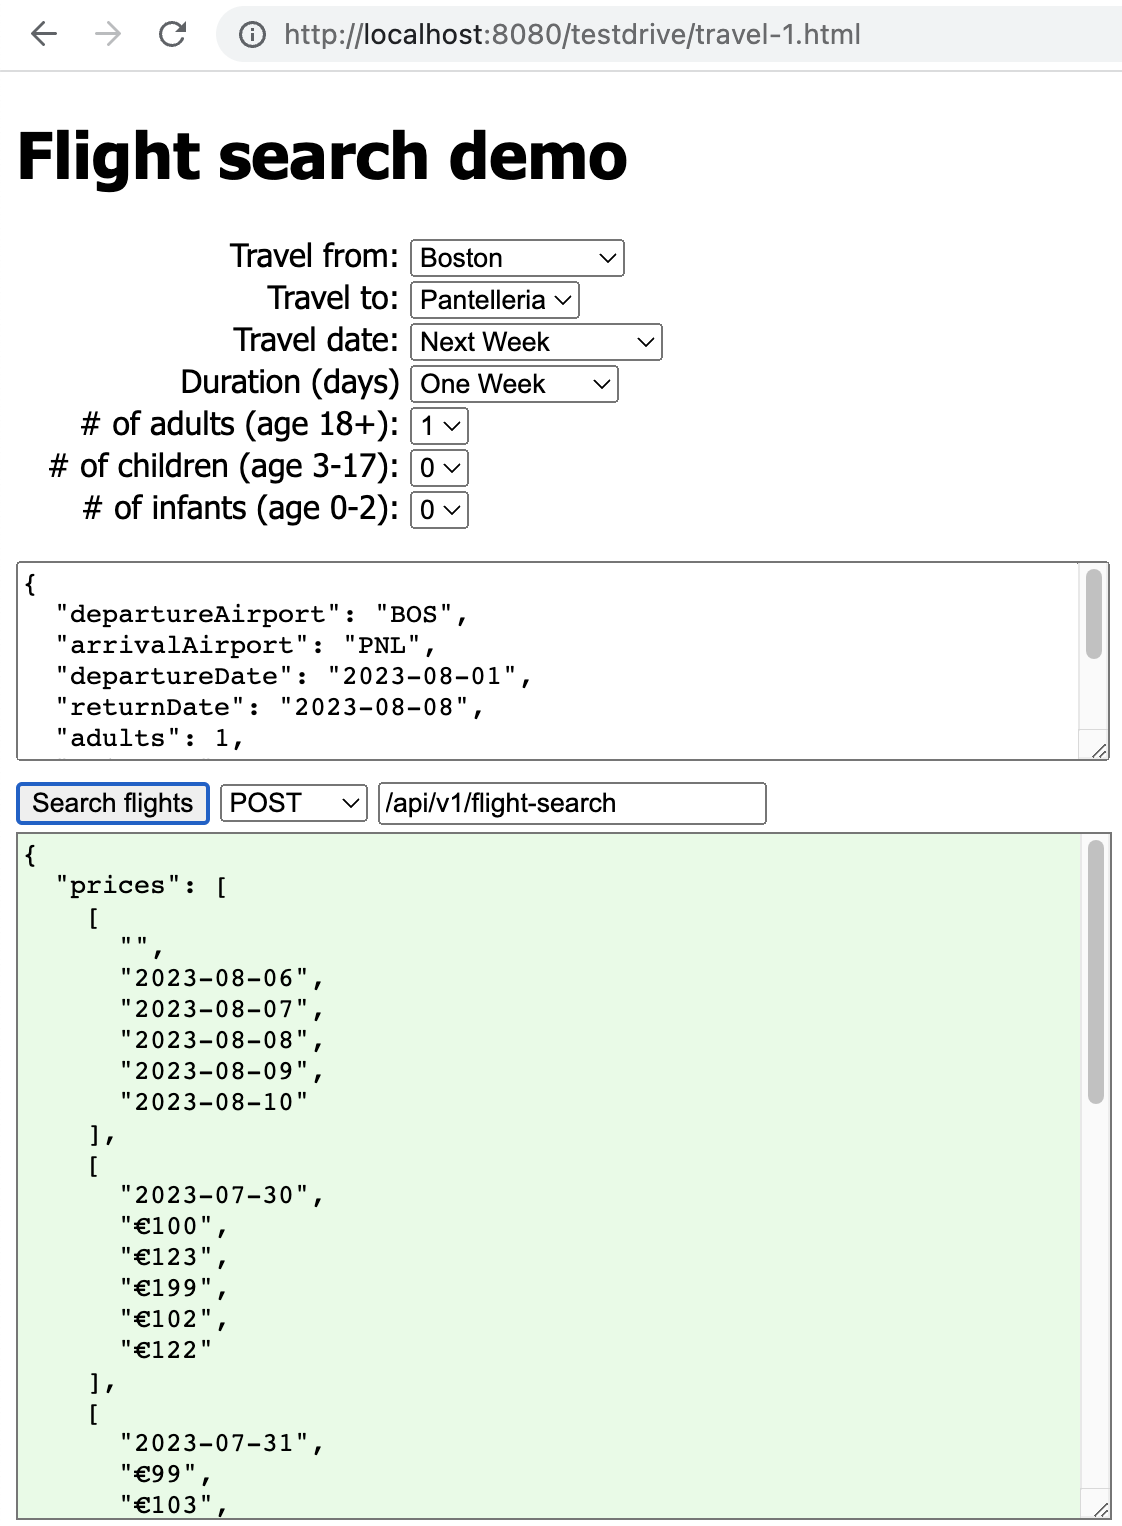
Figure 6: JSON responses tend to be complicated too
It’s difficult for humans to make sense of the price matrix in JSON, so we
can parse the JSON and format it in a nice HTML table.
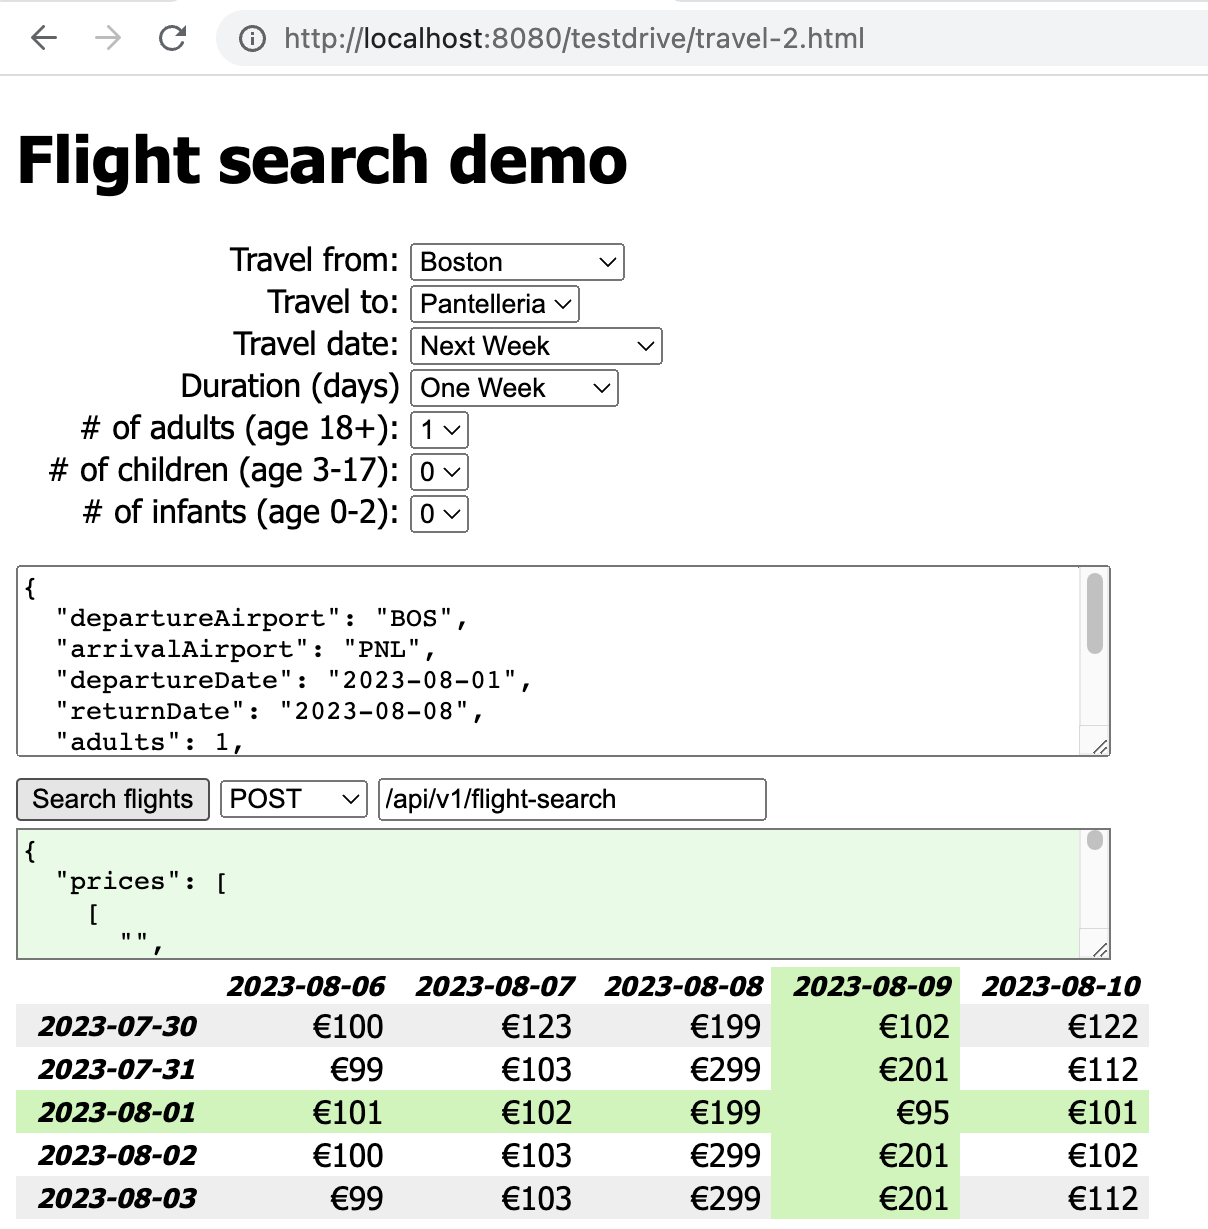
Figure 7: Parsing the response and presenting it
in an easy-to read format
A simple HTML table can go a long way to make it easy for technical and
non-technical users to verify the results of the API.
Common questions
Why not use Swagger UI instead?
Swagger UI satisfies some of the same good qualities as the Demo Front-End:
it can be made immediately available,
it is defined in the same source code repository as the source code;
it is served from the same service that serves the API.
It does have some drawbacks, compared to the Demo Front-End:
- The input and output payloads in Swagger UI are limited to JSON: you cannot make it more readable.
- It’s not friendly to non-technical users.
- It can only serve static payloads; what if you need to provide a random id at every invocation?
What if the payload should contain the current date? The user must remember fix the payload by hand,
and they need to know how to fix it. With a bit of JavaScript, you can easily provide this
automatically in the Demo Front-End - Swagger UI does not support workflows; with a Demo Front-End,
you can guide the user by presenting in the proper order the calls to be made.
You can also take parts from the output of one call, and use them to prepare the payload for the next call in a workflow
Should we set up a dedicated build with npm?
If your Front-End uses a dedicated build command, then you have an extra step in your
local edit-compile-run-test loop: this makes your loop slower. It also requires you
to complicate your Continuous Integration and delivery automation: now your source code repository
produces two artifacts instead of one; you have to build both and deploy both.
For these reasons, I don’t recommend it. If you are used to “big” Front-End frameworks
such as Angular, you might be surprised at how much can be done just by loading
jQuery or React in an inline <script> tag.
Aren’t we doing work that the client did not ask for?
The Demo Front-End improves some cross-functional properties of the product, that
the client is likely to appreciate: at the very least, the testability of the
product and the developer experience, hence the speed of development, but there
are other cross-functional properties that might be usefully impacted.
Let me tell you a story: a while back, we were engaged in the rewrite of an API product.
In that product, an API calls could result in tens of calls to other downstream services,
and each of those downstream call could fail in the HTTP sense, by returning an HTTP error status code, and could fail logically, by returning a logical error code in the response payload.
Given that any of those tens of downstream calls failing in different ways could
result in a different, unexpected result in our API response, it was clear that we needed
a way to quickly see what happened when our system interacted with downstream services, so
we enhanced the Demo Front-End with a report of all downstream services interaction, showing the request and response from each downstream call in response to one call to our API.
The Demo Front-End eventually became a killer feature that contributed greatly to the success of the product, because it allowed testers to debug easily why a call didn’t produce the expected result. The Demo Front-End was eventually made available in production too, so that internal users could troubleshoot calls coming from the product clients, i.e., their partners. The client told us they were happy because they could now troubleshoot in minutes why a call didn’t work as expected, compared to days in the previous system.
The client did not explicitly ask for a Demo Front-End, but they had told us during the project inception, how difficult it was for them
to troubleshoot why some calls to the API were returning unexpected values, using their current system.
The Demo Front-End we built for them was, among other things, a solution to a problem
that they told us they had.
Going further
APIs endpoints are often meant to be used in succession, to support some
kind of automated workflow, or perhaps a decision process on the part of a
human user. In these cases, we may extend the Demo Front-End to explicitly
support the workflow. In a way, the Demo Front-End can be used as documentation
for API users on how to use the API, or as a prototype frontend to be taken as
an example for a full implementation.
There is some sample code that can be used as a starting point in this
git repository; the screenshot were taken from it.


