
The Jumper T20S Gemini represents an evolutionary step in the world of radio transmitters, boasting an internal ExpressLRS RF module with dual transmitters. This innovative design facilitates Gemini Mode, a feature that sets it apart in the current radio market. However, my tests reveal some potential concerns with its 1W output. Let’s explore these findings in depth.

New to FPV? You can learn more about FPV drone radio transmitters in this buyer’s guide: https://oscarliang.com/radio-transmitter/
Where to Buy?
You can purchase the Jumper T20S Gemini from these vendors:

Design and Build Quality
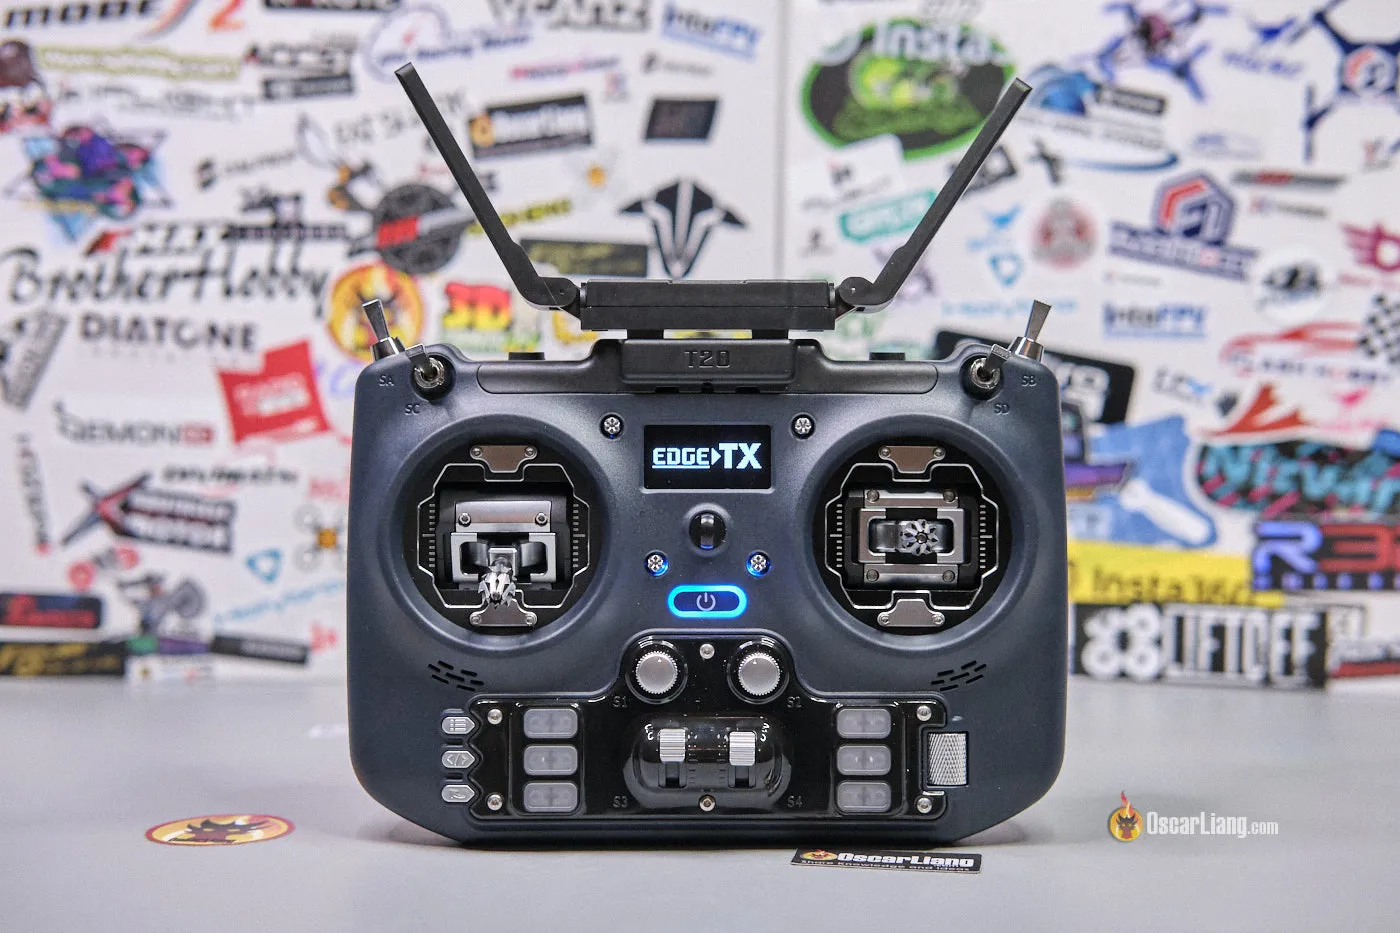
Externally, the T20S Gemini mirrors its predecessor, the T20S, in terms of design, build, interface, ergonomics, and RDC90 gimbals. Here’s a side by side comparison between these models. Note: My T20S has undergone various modifications, details of which you can find here:

Below are some detailed shots of the T20S Gemini edition.


The key difference is the built-in Gemini Mode transmitter module and its dual folding antennas, designed to be positioned at 90 degrees to each other for optimal performance.


I am not going into details about the gimbals, switches, user interface and ergonomics in this review, since they are identical to the original T20S. If you wish to know more check out my previous review: https://oscarliang.com/jumper-t20-radio/. Instead, I’ll focus on what sets this model apart.
Gemini Mode Support
The standout feature of the T20S Gemini edition is its Gemini Mode capability.
Now, if you are unfamiliar with Gemini Mode, check out in this post: https://oscarliang.com/expresslrs-gemini/. To put it simply, there are 2 transmitters inside the radio, which is capable of transmitting 2 packets simultaneously on separate frequencies, increasing redundancy and reliability of the radio link. It doesn’t necessarily increase range but significantly enhance link quality especially in noisy environment.
Due to the increased power consumption and heat, it has a cooling fan attached to the heatsink on the back. The fan is very quiet and you can hardly notice it when running.

With greater sophistication comes a higher price point and the need for compatible “true diversity” receivers, further increasing the cost. Here’s an example of “true diversity” receiver: https://oscarliang.com/expresslrs-diversity-receivers/#BetaFPV-SuperD
For those who fly in short to medium distance and open field, the original version is more than adequate in my opinion. However the Gemini version offers better radio link reliability in challenging environment.
The T20S Gemini is also compatible with standard receivers (non diversity), simply switch to the traditional antenna mode in the ExpressLRS LUA script (ANT 1 or ANT 2 modes). To use Gemini Mode, simply put Antenna mode to Gemini in the configuration.

External Module Bay
The T20S Gemini might not come with a built-in module bay, but it does support external modules. There are screw holes on the cooling fan on the back, specifically designed for installing a removable module bay adapter. However, keep in mind that this adapter isn’t included in the package and will need to be purchased separately.
Peeling back the rubber cover below the cooling fan reveals the XT30 power output (7.4V 1.5A) and a data port for connecting to an external module.

ExpressLRS
The T20S Gemini features an internal ExpressLRS module. You can flash its firmware in ExpressLRS Configurator, the firmware target “Jumper Gemini T-20 2.4GHz TX” is now correctly listed under “Device”. Updating the firmware was a breeze for me using the passthrough method.
A quick tip for those updating: always ensure you’re working with the latest LUA script. Grab the newest version, replace the outdated script in your SD card’s SCRIPT > TOOLS Folder, and then remove the old files, i.e. elrsV3.luac and elrsV3.lua.
If you are new to ExpressLRS, check out my detailed setup guide: https://oscarliang.com/setup-expresslrs-2-4ghz/
EdgeTX
The Jumper T20S Gemini comes preinstalled with EdgeTX firmware, which is currently the most widely used radio firmware in the FPV community.
A notable feature about the T20S is its elimination of the SD card slot. And no, it’s not an oversight. In fact, the T20 doesn’t even require an SD card. Instead, it boasts an onboard 512MB flash memory. This serves as a storage for what’s typically termed as “SD Content” where model images, audio files and radio backups are stored. That means you won’t need to purchase an SD card separately.
You can access the storage via the USB-C port: connect the cable while the radio is active, when prompted, select the USB Storage (SD) option.
While you likely won’t need to mess with firmware when the radio arrives, it’s certainly possible to flash EdgeTX firmware using one of the two methods described in my tutorial: https://oscarliang.com/flash-edgetx/
Battery
The included battery holder accommodates two 21700 batteries, though it’s possible to fit 18650s. This flexibility is a plus for users with different battery preferences.

Batteries are not included, and need to be purchased separately. Get them here:
21700 Li-ion cells:
18650 Li-ion cells:
For those using 21700, brace for a tight fit. It takes a firm push to close the battery bay lid. The holder also supports 18650, just pull the contacts outwards with a pair of pliers, so they can hold the smaller 18650 cells securely. I personally prefer 18650 for its lightweight and overall weight balance, even if it trades off some battery longevity.
Power Consumption and Battery Life
The Gemini’s power draw varies with the RF power setting. Here’s what I observed:
Gemini Mode:
- 0.40A at 25mW
- 0.59A at 250mW
- 1.12A at 500mW
0.76A at 1W
Ant1 / Ant2 Modes:
- 0.28A at 25mW
- 0.40A at 250mW
- 0.59A at 500mW
0.60A at 1W
The T20S Gemini seems to use a bit more power than the original version possibly due to the cooling fan.
Surprisingly, the 1W setting draws less current than expected. It is confirmed by my RF output testing, the radio produce only around 400mW power at 1W settings, hence the low current draw (more details in Output Power Testing section below).
A notable point is the increased battery consumption in Gemini Mode due to powering two transmitters. Users should be prepared for a faster battery drain when using the Gemini Mode.
Here’s a rough estimation of battery life:
- In Gemini Mode, using 21700 4500mAh cells, you can expect around 12 hours of run time at 10mW, or approximately 4 hours at 500mW. With 18650 3000mAh cells, this drops to roughly 8 hours at 10mW or about 2.5 hours at 500mW.
- In Ant 1 or Ant 2 modes, using 21700 4500mAh cells, you can expect around 14 hours of run time at 10mW, or approximately 7 hours at 500mW. With 18650 3000mAh cells, this drops to roughly 9 hours at 10mW or about 4.5 hours at 500mW.
To optimize battery life, you can utilize the Dynamic Power option available in the ExpressLRS LUA script. With Dynamic Power, the mW output adapts to the model’s range, signal strength and link quality, minimizing power consumption. This feature allows for as little as 10-25mW usage during unobstructed line-of-sight flights.
Charging
Apart from data connection, the USB-C port located on top is also used for battery charging.

One of the downsides of the T20S Gemini is its slow charging. PD chargers don’t seem to work properly, and it only support normal 5V chargers. Consequently, its charge rate is a modest 4W, dropping even lower as the battery nears full charge.
Estimated charging times are as follows:
- 21700 4500mah batteries: Approximately 9 hours
- 18650 3000mah batteries: Just under 6 hours
Playing Simulators
The Jumper T20S Gemini is plug and play with popular FPV simulators such as Tryp and Liftoff. When connected, it’s automatically recognized in the simulator and shows up as “Radiomaster TX16S”. While it’s the wrong model, it doesn’t affect usage, and the setup remains the same as all other mainstream remotes.
Tear Down
Disassembling the Jumper T20S Gemini can be somewhat cumbersome as there are many screws involves. To start, gently pry out the rubber inserts on the back. Then, unscrew the 10 screws which hold the front and back housing together. Don’t forget to loosen the two top switches during this process.

Be cautious of the 3 cables connecting the front and back housing, which needs to be unplugged first before pulling the radio apart.

All the switches are connected to the mainboard using cables. This design choice simplifies any repair or replacements you might need to do down the road.

The build quality and internal designs are largely similar to the original T20, apart form the PCB color (used to be green but now black), and the RF module boards.

Output Power Testing
Here are the power measurements of the Jumper T20S Gemini’s internal module at different output power levels. These measurements were taken using the ImmersionRC Power meter V2.
Gemini Mode
| Power Levels | 25mW | 50mW | 100mW | 250mW | 500mW | 1W |
| T20S Internal Module | 21mW | 47mW | 86mW | 211mW | 462mW | 404mW |
Antenna 1
| Power Levels | 25mW | 50mW | 100mW | 250mW | 500mW | 1W |
| T20S Internal Module | 21mW | 45mW | 85mW | 208mW | 450mW | 490mW |
Antenna 2
| Power Levels | 25mW | 50mW | 100mW | 250mW | 500mW | 1W |
| T20S Internal Module | 25mW | 55mW | 101mW | 233mW | 482mW | 425mW |
Interestingly, at 1W, the output is around 400-500mW. I repeated the test 3 times, tried different ExpressLRS configurations, and also tried higher input voltage, similar results. Could this indicate a flawed internal RF module, or am I just unlucky with a bad unit? Anyway, 500mW seems to be more promising, so I tested it further for consistency.

After a 20-minute test at 500mW in Gemini mode, the output stabilized at around 450mW. The cooling fan seems to be effective in keeping the module cool. I’d probably avoid using 1W setting with my T20S Gemini radio, and stick to 500mW.
How to Setup
I have a tutorial on how to setup the T20S from scratch: https://oscarliang.com/setup-jumper-t20s-radio/
Conclusion

Gemini Mode is particularly well-suited for pilots who operate in RF-noisy environments or require a highly reliable link for their flights. Its appeal extends to both hobbyists and professionals who might experience interference issues with standard transmitters.
You can purchase the Jumper T20S Gemini from these vendors:
Jumper is the first to release a radio with built-in Gemini compatible module. While their pioneering effort is commendable, there seems to be issues with the 1W output – whether a singular defect or a broader quality control problem – is a concern. Fortunately, the 500mW performance seems to be solid in my testing, offering a reliable alternative for most users.
If you wish to run Gemini at 1W output power, currently your best bet is the BetaFPV SuperG module which I’ve reviewed: https://oscarliang.com/betafpv-superg-nano-transmitter-module/
If you wish to run 1W settings without Gemini Mode, get the original T20S, which is also cheaper: https://oscarliang.com/jumper-t20-radio/


